
close
Choose Your Site
Global
Social Media

Views: 0 Author: Site Editor Publish Time: 2026-10-18 Origin: Site


Anomalous Melt Flow Index (MFI) results rarely point to an actual machine failure. They almost always trace back to a fundamental preparation failure before testing even begins. When operators load poorly prepared materials into a plastometer, inaccurate data inevitably trickles down the line. This flawed data causes severe compounding errors in injection molding processes. You will quickly face unacceptable scrap rates, random short shots, and completely lost production efficiency. Proper melt flow index sample preparation directly solves this massive headache. It removes the unpredictable variables of residual moisture, trapped air pockets, and premature thermal degradation. Strict preparation protocols ensure you comply with rigorous international standards, including ASTM D1238 and ISO 1133. By mastering these conditioning steps, you lock in reliable baseline data. In this guide, we break down the critical steps to standardize your testing workflow. You will learn how to handle different polymer types, optimize physical barrel loading techniques, and choose the right laboratory equipment to completely eliminate operator variance.
Consistent MFI test conditioning dictates the reliability of your flow rate data.
Hygroscopic polymers (like ABS and PA) require strict, verified pre-drying protocols; assumptions here lead to false-positive high flow rates.
Precise packing and tamping techniques are non-negotiable for preventing air entrapment and ensuring uniform heat transfer in the plastometer barrel.
Upgrading from basic ovens to precision moisture analyzers and automated packing tools significantly reduces operator-to-operator variance.
Unpredictable melt flow rates create serious downstream manufacturing problems. When you base your injection molding parameters on flawed MFI data, product defects quickly multiply on the factory floor. You will likely see short shots where molds fail to fill completely. You might experience excessive flash pushing through mold partings. Finished goods often suffer from compromised mechanical properties, leading to field failures.
Residual moisture plays a massive role in these expensive processing failures. Trapped water essentially acts as a chemical plasticizer under high heat. It artificially inflates the melt flow rate during testing. You might think your tested batch flows easily based on the false data. However, it will behave completely differently inside an actual injection molder under pressure. This forces machine operators to constantly adjust temperatures and pressures, destroying process stability.
A successful preparation protocol completely eliminates this costly guesswork. It yields high repeatability across multiple batches. Industry professionals measure this consistency through high R-values in statistical process control. Standardized preparation ensures different operators get the exact same results on the same batch of resin. This consistency directly optimizes the downstream molding process, stabilizing cycle times and protecting profit margins.
Short Shots: Caused by expecting a higher flow rate than the material actually possesses.
Excessive Flash: Occurs when operators compensate for poor data by over-pressurizing the mold.
Brittle Parts: Results from molecular breakdown ignored during flawed laboratory testing.
Polymer behavior directly dictates your entire laboratory workflow. We group materials based on their moisture-absorption characteristics. Understanding these categories prevents catastrophic testing errors and guides your technicians effectively.
Non-hygroscopic materials include polyethylene (PE), polypropylene (PP), and polystyrene (PS). They require minimal drying before testing. Moisture mostly sits on the outer pellet surface rather than penetrating the core. For these plastics, preparation strictly focuses on contamination prevention. You must ensure uniform pellet sizing to guarantee even melting inside the barrel. Operators should keep storage bins sealed against ambient plant dust. However, they rarely need extended oven times.
Hygroscopic materials demand an entirely different, highly rigorous approach. Acrylonitrile butadiene styrene (ABS), polyamides (PA), polyethylene terephthalate (PET), and polycarbonate (PC) absorb moisture deeply into their molecular structure. You cannot visually confirm dryness just by looking at the pellets. This fundamental characteristic makes plastic pellet moisture testing a mandatory pre-test gate. You must verify dryness before loading the plastometer.
If you skip this crucial step, water molecules will physically break the polymer chains under high testing heat. We refer to this chemical breakdown as hydrolytic degradation. Controlled-environment drying prevents this reaction inside the extrusion plastometer. You need a specific time and temperature matrix for every unique resin grade. Relying on generic drying guidelines often leads to under-dried samples and invalid flow indices.
Common Polymer Moisture Categorization
Polymer Family | Moisture Category | Drying Requirement | Primary Preparation Priority |
|---|---|---|---|
Polyethylene (PE) / Polypropylene (PP) | Non-Hygroscopic | Minimal (Surface only) | Contamination prevention and uniform size |
Polystyrene (PS) | Non-Hygroscopic | Minimal | Dust removal and temperature stabilization |
Acrylonitrile Butadiene Styrene (ABS) | Hygroscopic | Mandatory (e.g., 2-4 hours at 80°C) | Strict pre-test moisture verification |
Polyamide (PA / Nylon) | Highly Hygroscopic | Mandatory & Strict (e.g., 4-6 hours at 85°C) | Preventing hydrolytic degradation |
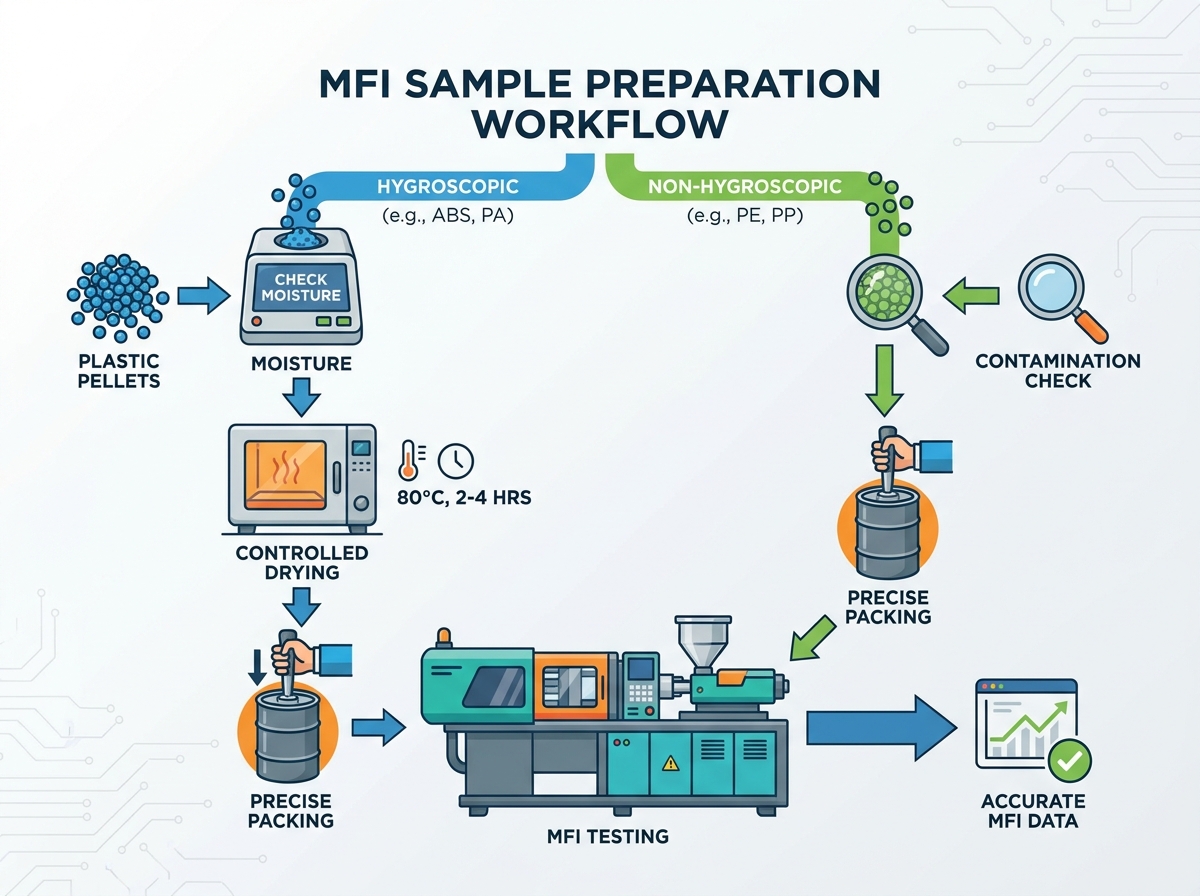
Let us detail the standardized physical procedure. Adhering strictly to these steps eliminates random data spikes and protects your laboratory reputation.
You must establish rigid baseline drying parameters before anything else. Consult your resin manufacturer specifications first. Never guess these parameters based on past habits. For example, standard ABS might require two hours at 80°C. Meanwhile, specific PA grades often need four hours at 90°C. You must use a dedicated desiccator to cool the samples after oven heating.
Once dried and cooled, you must act incredibly fast. Define a strict window of time between removing samples from the desiccator and loading the barrel. Hygroscopic materials immediately begin re-absorbing atmospheric moisture upon exposure. A safe operational window typically lasts under three minutes. If the technician gets distracted, the sample becomes contaminated by ambient humidity.
You must weigh pellets accurately to ensure a continuous, uninterrupted melt flow. ASTM D1238 and ISO 1133 provide clear guidelines for required sample mass. The required weight depends entirely on your expected flow rate. Low-flow materials require less mass. High-flow materials need a fully packed barrel to prevent early run-out before the test concludes.
Typically, you will load between 3 and 8 grams of polymer. If you underload the barrel, the piston bottoms out prematurely, voiding the test. If you overload it, you waste expensive material and risk uneven melting profiles. Use an analytical balance for exact measurements every single time.
Suggested Sample Mass and Cut Time Chart
Expected MFR Range (g/10 min) | Suggested Sample Mass (g) | Extrudate Cut Time Interval (s) |
|---|---|---|
0.15 to 1.0 | 3.0 to 4.0 | 240 |
>1.0 to 3.5 | 4.0 to 5.0 | 120 |
>3.5 to 10 | 5.0 to 6.0 | 60 |
>10 to 25 | 6.0 to 8.0 | 30 |
Proper physical packing directly influences the final viscosity reading. Introduce the weighed pellets into the pre-heated barrel in small, controlled increments. Standard MFI test conditioning relies heavily on a critical 5-to-7-minute pre-heating phase. During this time, the polymer must reach a completely uniform molten state without trapped gases.
Layer the pellets carefully. Use a dedicated tamping tool to compress each layer firmly. This mechanical action forces trapped air upwards and out of the barrel. However, avoid applying excessive manual force. Pushing too hard extrudes material prematurely out of the die before the official test begins. Consistent tamping ensures ideal heat transfer from the heated barrel walls directly to the center of the polymer mass.
Standardized procedures require highly reliable laboratory equipment. Upgrading your tools directly removes the human element from preparation, securing better data.
Basic convection ovens introduce dangerous humidity variables into your workflow. They simply heat ambient plant air. If your lab environment feels humid, the oven air remains humid. This slows down the drying process unpredictably and leaves residual water. A precision halogen moisture analyzer provides a far better laboratory investment. It actively monitors mass loss over time. This gives you concrete pre-test validation. You know exactly when the sample reaches the target moisture threshold, completely removing guesswork.
Manual tamping varies wildly between different operators. One technician might tamp aggressively, while another packs lightly. You can eliminate this variance completely with modern add-ons. Motorized tamping tools apply consistent, measured pressure every single time. Precision loading funnels prevent pellet spillage and significantly reduce manual loading times. These mechanical upgrades offer immediate operational benefits by protecting data integrity and standardizing the physical packing force.
Your selected equipment must support modern audit trails. Advanced testing units generate automated digital logs for conditioning times and temperatures. They record exact pre-heating durations without operator input. These automated logs guarantee you comply fully with strict ISO and ASTM auditing requirements. When auditors review your quality assurance processes, digital traceability proves your sample preparation meets global standards.
Even highly experienced technicians make preparation mistakes under pressure. Let us examine the most frequent laboratory risks and how to fix them permanently.
Symptom: You record an artificially low melt flow index compared to historical data. The polymer suffers from severe cross-linking or thermal degradation due to excessive heat exposure.
Fix: Enforce strict adherence to maximum time and temperature limits. Never leave samples baking in ovens overnight unchecked. Over-baking destroys the molecular integrity of the plastic, rendering the sample useless. Implement lab timers and clear standard operating procedures regarding maximum oven times.
Symptom: You notice visible bubbles forming in the extruded plastic strand. You clearly hear tiny popping sounds during extrusion. The automated weight cuts show wild inconsistencies across consecutive cuts.
Fix: Implement a strict standardized micro-batch loading procedure. Technicians should tamp the material every 1 to 2 grams. Never dump the entire 5-gram sample mass into the barrel at once. Incrementally packing the material forces air out efficiently.
Symptom: You see strange color streaks or black specks in the extrudate. Test results fluctuate randomly due to microscopic cross-contamination between different polymer tests.
Fix: Write detailed standard operating procedures for post-test cleaning. Follow a strict cleaning sequence to ensure purity.
Eject the die immediately after the test concludes while the barrel remains hot.
Push a heavy cotton cleaning patch through the barrel using the main piston rod.
Scrub the inner cylinder walls vigorously using a specialized brass brush.
Inspect the die orifice visually for microscopic carbon buildup.
Perform a final wipe down using a clean cotton patch to ensure zero residue remains before the next test.
Accurate MFI data always starts long before the plastic ever touches the heated testing barrel. You cannot control your downstream injection molding manufacturing if you do not strictly control your laboratory inputs. Flawed sample preparation introduces hidden variables that ruin production efficiency.
To secure your quality assurance process, take the following actions:
Conduct a baseline audit of your current lab drying equipment and verify its actual performance.
Observe operator packing techniques directly to identify inconsistent tamping force and correct bad habits.
Shortlist precision halogen moisture analyzers immediately if you process hygroscopic resins.
Invest in automated extrusion plastometers if your current data variance exceeds acceptable QA limits.
A: You should typically dry standard ABS for 2 to 4 hours at 80°C. Polyamide (PA) generally requires 4 to 6 hours at 85°C. However, resin manufacturer data sheets always supersede general guidelines. Different molecular weight grades demand specific drying matrices to prevent thermal degradation while ensuring complete moisture removal.
A: The core mechanics of melting and extruding remain nearly identical. However, ISO 1133 generally enforces stricter tolerances for pre-heating phases and conditioning times. It requires highly precise operator adherence to timelines. ASTM D1238 provides slightly more flexibility, but both standards demand rigorous baseline preparation for valid comparisons.
A: No. You must never skip moisture verification. Even virgin hygroscopic pellets actively absorb atmospheric humidity during transit, warehousing, and staging. Packaging seals frequently fail. Ambient plant conditions fluctuate daily. Verifying dryness remains critical to prevent water molecules from artificially inflating your recorded melt flow rates.


